The current date and time is a very common piece of data needed in a lot of Excel solutions.
The great news is there a lot of ways to get this information into Excel.
In this post, we’re going to look at 5 ways to get either the current date or current time into our workbook.
Video Tutorial
Keyboard Shortcuts
Excel has two great keyboard shortcuts we can use to get either the date or time.
These are both quick and easy ways to enter the current date or time into our Excel workbooks.
The dates and times created will be current when they are entered, but they are static and won’t update.
Current Date Keyboard Shortcut

Pressing Ctrl + ; will enter the current date into the active cell.
This shortcut also works while in edit mode and will allow us to insert a hardcoded date into our formulas.
Current Time Keyboard Shortcut

Pressing Ctrl + Shift + ; will enter the current time into the active cell
This shortcut also works while in edit mode and will allow us to insert a hardcoded date into our formulas.
Functions
Excel has two functions that will give us the date and time.
These are volatile functions, which means any change in the Excel workbook will cause them to recalculate. We will also be able to force them to recalculate by pressing the F9 key.
This means the date and time will always update to the current date and time.
TODAY Function

= TODAY()This is a very simple function and has no arguments.
It will return the current date based on the user’s PC settings.
This means if we include this function in a workbook and send it to someone else in a different time zone, their results could be different.
NOW Function

= NOW()This is also a simple function with no arguments.
It will return the current date and time based on the user’s PC date and time setting.
Again, someone in a different time zone will get different results.
Power Query
In Power Query, we only have one function to get both the current date and current time. We can then use other commands to get either the date or time from the date-time.

We first need to add a new column for our date-time. Go to the Add Column tab and create a Custom Column.

= DateTime.LocalNow()In the Custom Column dialog box.
- Give the new column a name like Current DateTime.
- Enter the DateTime.LocalNow function in the formula section.
- Press the OK button.
Extract the Date
Now that we have our date-time column, we can extract the date from it.

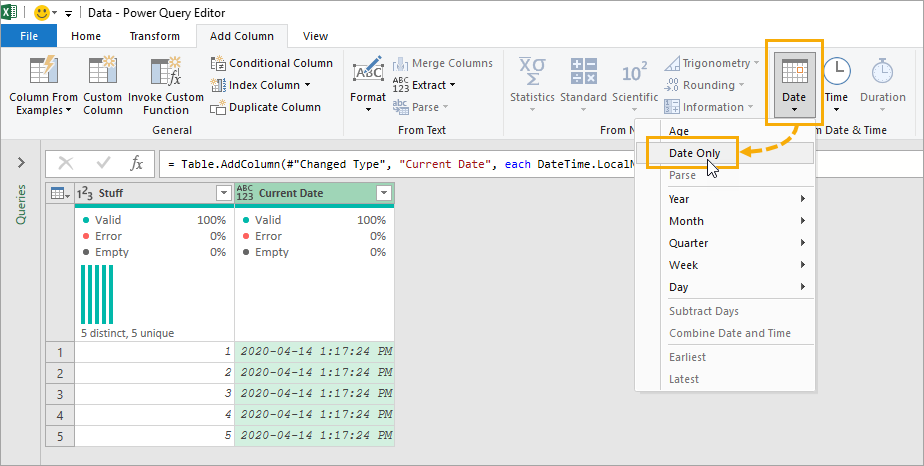
We can select the date-time column ➜ go to the Add Column tab ➜ select the Date command ➜ then choose Date Only.
= Table.AddColumn(#"Added Custom", "Date", each DateTime.Date([Current DateTime]), type date)This will generate a new column containing only the current date. Power query will automatically generate the above M code with the DateTime.Date function to get only the date.
Extract the Time
We can also extract the time from our date-time column.

We can select the date-time column ➜ go to the Add Column tab ➜ select the Time command ➜ then choose Time Only.
= Table.AddColumn(#"Added Custom", "Time", each DateTime.Time([Current DateTime]), type time)This will generate a new column containing only the current time. Power query will automatically generate the above M code with the DateTime.Time function to get only the time.
Power Pivot
With power pivot, there are two ways to get the current date or time. We can create a calculated column or a measure.

To use power pivot, we need to add our data to the data model first.
- Select the data.
- Go to the Power Pivot tab.
- Choose the Add to Data Model command.
Power Pivot Calculated Column
A calculated column will perform the calculation for each row of data in our original data set. This means we can use the calculated column as a new field for our Rows or Columns area in our pivot tables.
= TODAY()= NOW()It turns out Power Pivot has the exact same TODAY and NOW functions as Excel!

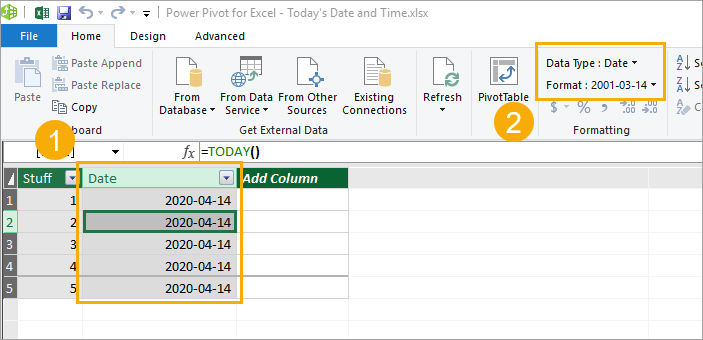
We can then add a new calculated column inside the power pivot add in.
- Double click on the Add Column and give the new column a name. Then select any cell in the column and enter the TODAY function and press Enter.
- Go to the Home tab ➜ Change the Data Type to Date ➜ Change the Format to any of the date formats available.
We can do the exact same to add our NOW function to get the time and then format the column with a time format.
Power Pivot Measure
Another option with power pivot is to create a measure. Measures are calculations that aggregate to a single value and can be used in the Values area of a pivot table.
Again, we can use the same TODAY and NOW functions for our measures.

Add a new measure.
- Go to the Power Pivot tab.
- Select the Measures command.
- Select New Measure.

This will open up the Measure dialog box where we can define our measure calculation.
- Give the new measure a name.
- Add the TODAY or NOW function to the formula area.
- Select a Date Category.
- Select either a date or time format option.
- Press the OK button.

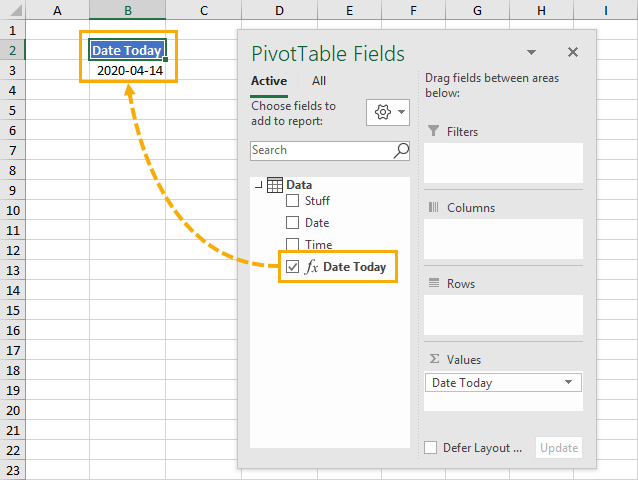
Now we can add our new measure into the Values area of our pivot table.
Power Automate
If you’re adding or updating data in Excel through some automated process via Power Automate, then you might want to add a timestamp indicating when the data was added or last updated.
We can definitely add the current date or time into Excel from Power Automate.

We will need to use an expression to get either the current date or time. Power Automate expressions for the current time will result in a time in UTC which will then need to be converted into the desired timezone.
= convertFromUtc(utcNow(),'Eastern Standard Time','yyyy-MM-dd')This expression will get the current date in the EST timezone. You can find a list of all the timezone’s here.
= convertFromUtc(utcNow(),'Eastern Standard Time','hh:mm:ss')This expression will get the current time in the EST timezone.
Conclusions
Like most things in Excel, there are many ways to get the current date and time in Excel.
Some are static like the keyboard shortcuts. They will never update after entering them, but this may be exactly what we need.
The other methods are dynamic but need to be recalculated or refreshed.
Do you have any other methods? Let me know in the comments!
 👉 Find out more about our Advanced Formulas course!


Thanks very much !